Mesh weight workflows
May 18th, 2020
Weights let you bind the vertices of a mesh to bones. Instead of using free form deformation on individual vertices, you can move vertices by moving the bones they are bound too. Using bones to deform meshes makes it easier to control complex mesh setups and is much more efficient then setting deform keys.
In our previous blog posts on mesh creation tips and a taxonomy of meshes we've discussed the foundations of creating meshes. Here we continue our exploration by discussing workflow tips for assigning weights to your mesh vertices.
One mesh, multiple outputs
Given the same mesh, we can achieve very different results by using different bones and weights to manipulate the vertex positions.
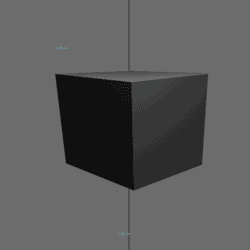
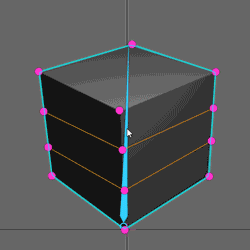
For example this tip shows a cube, weighted so that it pivots around the bone in the front:

Here is the same cube mesh, with the same set of bones, but with the weights reversed so the mesh pivots around the bone in the back of the cube. The reversal is done by inverting the weights and the list of bones the mesh is weighted to.
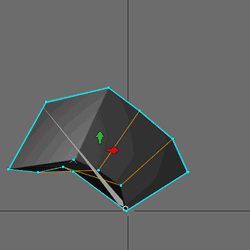
Here is the same cube mesh again, but with weights set so that the cube pivots around the axis between the vertices in the left and right corners:
Planning ahead
In our previous blog posts on meshes, we established simple rules for placing mesh vertices based on the mesh's purpose. We can extend this purpose-based thinking to setting weights. Thankfully, we already did most of the planning when we decided the structure of the mesh.
We've already seen some examples of this purpose-based thinking for weights in the previous section, which considered around which bones the mesh and its vertices should pivot.
What we need to answer when setting weights is the following question: which vertices should be moved by which bone to fulfill the purpose of the mesh?
To make our life easier, we should always strive for simplicity. When setting weights, this means we want to weight vertices to the minimum number of bones necessary for the mesh to fulfill its purpose. The fewer bones we have to deal with to manipulate a mesh, the easier it becomes to animate the mesh.
Here's another example: we can turn our rather static cube into a bendy, jelly cube by first modifying its mesh structure to allow bending, then setting the weights so the bending can be easily controlled by a single bone. Note that this setup only allows us to bend the cube as illustrated in the GIF below. Limiting the cube's "purpose" this way allows the setup to be simple.

Be mindful of when you bind meshes to bones
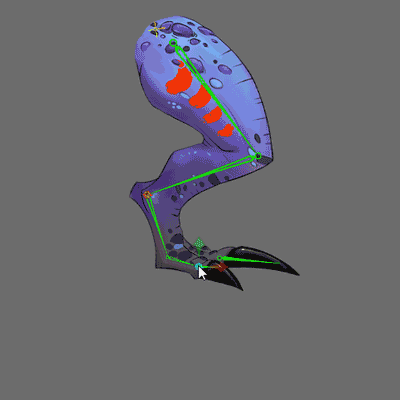
By binding meshes in animate mode, you can create advanced setups that add alternative poses which use a different configuration of bones. We've described this process in this blog post, where two different poses of the same wing are bound to the same set of bones.

However, for new users this freedom could be dangerous if used carelessly.
A mesh will remember the position of the bones at the time it was bound to them. A common beginner mistake is to move a bone around, bind a mesh to it, then move the bone back to its original place. Doing this causes the vertices to move when changing the weights, as the bone position is now different from the position it had when we bound the vertices to it.
When binding a mesh in animate mode, the chances of this accidentally happening are even higher, as we tend to move bones around a lot more in animate mode than in setup mode.
Therefore it is almost always best to bind your meshes in setup mode, unless you specifically need to bind a mesh in animate mode to add an alternative pose.
Fortunately, if this kind of little accident happens, it is possible to assign a new binding position to the selected mesh by pressing the update bindings button. This will update the bone positions that the vertices "remember" to the current bone positions, discarding the previous positions.
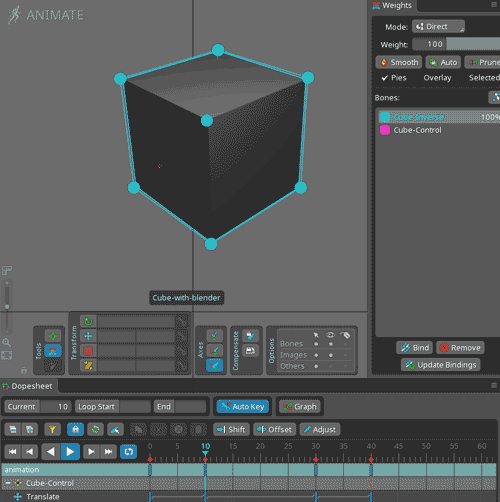
Set and test weights in animate mode
Weights are set automatically the first time a mesh is bound to bones. To see the effect of our weights, we might be tempted to move the bones around in setup mode. It can be fine to move bones to see how the weights deform and then use undo, but as explained in the previous section, moving the bones in setup mode means the vertices will move when weights are adjusted.
How can we make this process safer? By setting weights directly in animate mode! Create a test animation in which the bones that should deform the mesh are moving, then adjust the weights until you're happy with the results.
This is especially useful when simulating depth or dealing with complex meshes. Seeing your weights in motion makes it so much easier to adjust them compared to setting them while looking at a still pose.
Pressing Ctrl (Cmd on Mac) temporarily pauses the animation, making it easier to select the vertices with the weights direct tool.
Start from extremes
When testing the effectiveness of the weights assigned to a mesh, always start from the extremes. That is to say, the two most opposite values or positions. We can apply this process to bone positions as well as weights, giving us two different workflows.
The easiest way to set the weights for a mesh is to start by assigning a value of 100% to the vertices that are on the extreme opposite ends of the movement the mesh needs to make. Next, work on getting the vertices in between to balance the mix of weights in an amount that follows the movement planned for the mesh. This applies to nearly all meshes except the simple meshes, which are concatenated instead.

For example, for meshes that are simulating depth, start with the vertices that are the farthest away from the viewer and assign the initial weights of 100% to the bone that will control them. Next, identify the vertices that should be the closest and assign them 100% influence to the bone that will control those. Finally, while playing a test animation, adjust the weights for the vertices in between to achieve the depth effect.
The other way to start from extremes consists of moving the bones controlling the mesh to positions or poses that are beyond what will actually be needed when animating. If a leg should bend, break it a little by going slightly beyond the possible angles. If a face should rotate in space, push it to the extreme limit (which sometimes can look rather comical).
The reason to do this is that at such extremes the fine tuning of the weights becomes easier because the weights that need to be corrected stand out. Also, supporting a greater range of motion can provide the animator with more freedom.
Often multiple passes are needed: after everything looks fine in one direction or extreme position, test the opposite extreme and fix any weights that don't look good. Then place the bones in the previous pose to see if anything went out of place when fixing the other direction.
After everything looks good in all the extremes, the in between poses will likely already look fantastic.
Group weights
Another way to simplify the process of assigning weights is to find groups of weights that can have all the same weight, or close to it to start with.
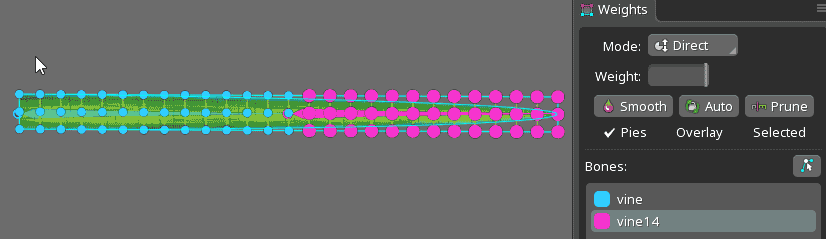
Meshes that bend only from a side view make this process quite easy. For example, if you want an arm to retain its shape in the upper part, you will need to select at least 4 vertices and weight them all to the upper arm bone. Then repeat the process for the lower part of the arm. With that out of the way, figuring out the weights for the vertices at the elbow, where the arm bends, is much easier. These can also be selected in pairs of two vertices if the mesh is tubular.
Meshes that simulate depth are a bit trickier. Imagine dividing the mesh into several slices. The slices could be at regular intervals from the part of the mesh that is the most far away toward the part that is the closest to the viewer. Each of these slices is a group of vertices that has the same weights because it's at the same depth from the viewer.

Even if the weights won't have the exact same weights in the end, having a general approximation is still very useful before fine tuning the weights that are not quite right yet.
This principle is similar to parallax scrolling, where groups of images move at different speeds to simulate depth.
Start from the parent
When a mesh is bound to more than two bones, it is a good idea to start weighting the mesh from the bone highest in the tree hierarchy and then descending one bone at a time. If the bones are independent, meaning one bone is not parented to the other, then you can simply choose to start from one side of the mesh and progress toward the other side.
Starting from the parent bone lets you to define the general motion first. You can then move on to the child bones to add detail to mesh sections that depend on the parent bone's weights.
For example to recreate the jelly cube, set the weights so it can bend nicely first. Next, add the weights of the the third child bone that controls the top of the cube.
Spine can do the math
Manually setting weights so that vertices are progressively more influenced by bones can be tedious. The quickest way to make a soft bending mesh is to weight half of its vertices 100% to one bone, and the other half to the other bone, then box select the weights in the middle, and press the Smooth button until the result satisfies you.
A similar result can be achieved by weighting a mesh with fewer vertices, then later adding more vertices to the mesh. Spine will automatically calculate the weights for you based on the surrounding vertices.
Overlapping triangles
When the mesh overlaps with itself, sometimes a part of the image that should be behind is instead drawn on top. When that happens you can fix it by changing the triangle order.
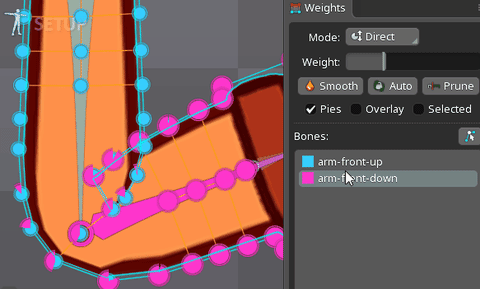
It can be useful to sort the bones a mesh is bound to so that the bone farthest away is the lowest in the list and the closest bone is at the beginning of the list. Assign vertices more weight to the bone that better represents their drawing order to resolve any overlapping issues.
Just like weights, the order of bones in the weights view for a mesh cannot be keyed in an animation. This also means that any adjustments to the triangle order will be reflected in all animations.
Mesh cleanliness
Unnecessary weights may be present in your mesh after calculating weights automatically, smoothing, or painting the weights on the mesh. Pruning these weights improves performance, reduces file size, and also makes the weights more manageable.

It may also happen that after setting the perfect weights, several vertices turn out to all have the exact same weights. Removing these extra vertices by editing the mesh and deleting them is another great way to improve performance and making weight adjustments easier.
Deform keys are the devil
This whole post is about weights, but what about deform keys? Many new Spine users are tempted to use deform keys to deform their meshes. Deform keys are powerful and have their place, but in most cases using weights is superior for a number of reasons.
First, keying a mesh's deform will key all the vertices together. For example, if your mesh is a head and you use deform keys to animate the ears flapping, you won't be able to come back afterward and animate moving the nose because every key to animate the ears also keyed the nose vertices. You would need to use a straight ahead workflow to animate both the ears and nose together. It is difficult to get this right on your first pass, and it is difficult to go back later and adjust the existing keys. The problem gets worse the more elements you want to animate in the same mesh, like the eyes or mouth.
When using weights, you would assign vertices for the ears and nose to different bones. You then key the bones separately rather than keying the entire mesh.
The other reason to avoid deform keys is that each deform key stores a vertex position for every bone that the vertex is weighted to. If you have 40 deform keys and 100 vertices and each vertex is weighted to 4 bones, those keys will be storing 40 * 100 * 4 = 16,000 vertex positions! This gets worse and worse as you add more meshes and deform keys and can result in your skeleton data being much larger than necessary.
When using weights, you only key the bones and those keys only need to store a little bit of information.
The movement when interpolating between deform keys is always in a straight line, while weights allow vertices to move more dynamically by using bone rotation, scale, or shear, or by having a vertex bound to multiple bones.
Lastly, it's a bit more efficient at runtime to animate bones than it is to apply deform keys. In both cases the vertices are still transformed by the bones, but additional work is required to interpolate between the deform keys.
So when should you use deform keys? Rarely and sparingly! They make sense if you really need to move each vertex separately and it would take many bones to do so with weights. Keep in mind that deform keys can be combined with mesh weights. Sometimes weights provide all the desired deformations, except for a specific pose where they don't quite deform as needed. In that case it can make sense to use a deform key or two to get the mesh to behave exactly as required.
Conclusion
We hope these tips can help you tackle weights and meshes in general and with more confidence. If you haven't already, don't forget to check the two previous blog posts exploring mesh creation tips and a taxonomy of meshes. What would you like to learn about next? We would love to hear your thoughts on the Spine forum.